
DIY Llama Cake
Complete your llama party with a DIY llama cake. Decorating cakes can be overwhelming but if you break it down into steps before you know it you will have completed your own awesome cake! Today we will show you how to make a very cool llama cake.
Miss 8 wanted to have a combined birthday BBQ with one of her best friends. Getting together the girls decided that they wanted to make it llama themed. A while back we had put together this post, 6 Awesome Llama Cakes where I got my llama cake inspiration from. I had made the girls a unicorn head cake for their joint 6th birthday so with a few modifications I used the same technique to create this llama head cake.
DIY Llama Cake

Llama head cakes look very fancy but they are actually pretty easy to make. I am not a professional cake decorator so if I can make it then so can you!
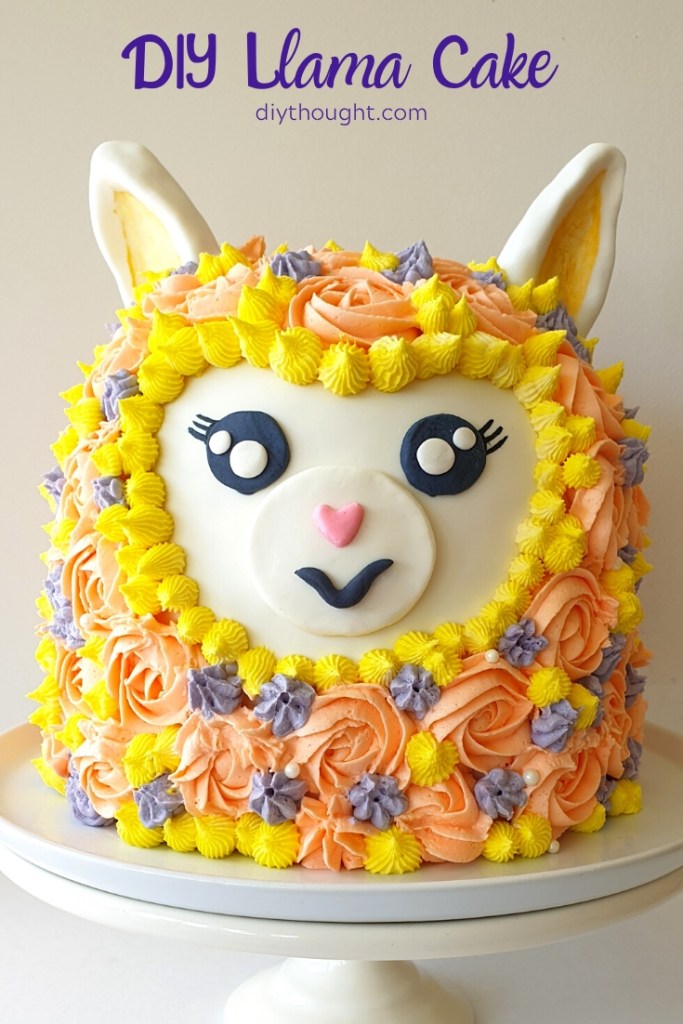
The cake is covered with a layer of fondant and then decorated with buttercream icing. If you feel more comfortable working with buttercream then a smooth layer of buttercream in place of the fondant will also work. The fondant provides a smooth base for the llama’s face and because it is largely covered with buttercream it doesn’t matter if there are a few not so perfect patches.
Have a look through photos of other llama cakes and alter this cake to make it your own. Mix up the colors or keep it the same, it is entirely up to you! We made our DIY llama cake using 8″ cake tins but a smaller 6″ cake would be ultra-cute as well.
You Will Need
This post contains affiliate links. These links add no cost to you but we earn a small commission through linked sales which go towards running diyThought. We thank you for your support.
- x3 cakes. Use your favorite recipe or have a look at our article 7 Perfect Birthday Cake Recipes. Two of the cakes are baked in round cake tins then other in a dome sphere shape tin or bowl.
- Buttercream. I use this one by Chelsea Sugar but you can use your favorite.
- Fondant. I love Satin Ice White Fondant as it seems to be easier to roll out and get on than some others that I have tried but use and it comes in the large quantity you need. If this is your first time decorating a cake a small extra pack of fondant could be useful as it is easier to use the fondant slightly thicker.
- Black food coloring.
- Pink food coloring for the nose.
- Food coloring for the buttercream. We used purple, peach and yellow.
- Metallic Gold airbrushing food paint to paint the inner ears.
- Paintbrush (only used for food).
- White Sugar Pearls (optional).
- Cake nozzles. Again use what you have! For the llama cake shown Wilton 1M, 109 and an open star tip.
- Piping Bags.
- Kebab sticks or wood cake dowels.
- Toothpicks.
- Cake spatula.
- Cake board or plate.
How To Make A Llama Cake
Cake Prep
The main part of the llama cake that you must make in advance is the cake ears. To do this pull off two balls of fondant and mold them into the ear shape. Insert a toothpick into the base of the ear. Place on a tray lined with baking paper and set aside to dry. It is ideal to do this at least a week in advance.
Go ahead and bake your cakes. This can be done a couple of weeks in advance. Cut the tops off so the cakes are level. Once they are cool wrap the cakes individually in plastic film and then aluminum foil before placing in the freezer if you are making them in advance.
Assemble the cake
Take all of your cakes and check that they are level. They will be stacked on top of each other so if they are not even you could get a cake that is on a bit of a funny angle!
Stack the cakes with the dome cake on the top, putting a layer of buttercream frosting between each layer.
Measure the kebab sticks (or cake dowels) against the cake and cut so they are shorter than the cake. Press four sticks into the cake. This provides some support and prevents the cake layers from shifting.
Cover the cake with a thin layer of buttercream frosting. Using the cake spatula make sure the icing is as even as possible. Place the cake into the freezer (or fridge/ cool spot) while you prepare the fondant.
Roll out the fondant so it is thin. I find it easier to roll it out onto two pieces of greaseproof paper. Carefully drape over the cake. Using your hands smooth down the sides of the cake. The fondant covering doesn’t need to be perfect as most of the cake will be covered with buttercream frosting. Cut excess fondant away from the bottom of the cake and gently press around the bottom of the cake so it looks neat and tidy.
Llamas’s face

Now make the fondant facepieces. You will need a large white fondant circle for the nose/ mouthpiece. To do this simply roll a small quantity of fondant into a ball and flatten into a circle. Color a tiny piece of fondant pink and make a small heart nose. Make a mouth shape from black fondant. Stick the nose and mouth onto the face base using water.
Using black fondant to make the eyes. To make the eyes roll the fondant thin and cut using the large circle end of the icing nozzle. Make the white dots for the eyes by rolling white fondant into a small ball and pressing flat. Stick together using water.
Chose the nicest part of the cake to transform into the face. Stick the face pieces onto the cake using a small amount of water. Insert the ears on the top of the llamas head. Add some extra fondant around the ears to provide support if needed. Using the metallic gold paint, paint inside the llama’s ears. Paint on eyelashes using the black gel food color.
Decorate with buttercream
Mix up a large quantity of buttercream. Divide into three bowls and add a drop of your chosen colors to each bowl and mix. Add each color to a piping bag set up with the nozzle you wish to use.
Start by going around the face. Using the largest nozzle design cover the cake and then fill in the gaps with the smaller designs. To make the buttercream roses start in the center and pipe in a circular motion outwards. It is a good idea to experiment with your buttercream in a separate bowl before piping it onto your cake. Don’t worry if it isn’t perfect, it is a llama after all.
Finishing up
Finish your cake by adding some white sugar pearls. Check that your plate is free from frosting. Well done, you have completed your DIY llama cake and it is time to enjoy that llama party!


latest video
news via inbox
Nulla turp dis cursus. Integer liberos euismod pretium faucibua
you might also like
Ensuring optimal nutrition for our furry companions is paramount to […]
You might be fortunate enough to have gorgeous curls all […]
In beauty, eyelash extensions rank among the most popular services […]


