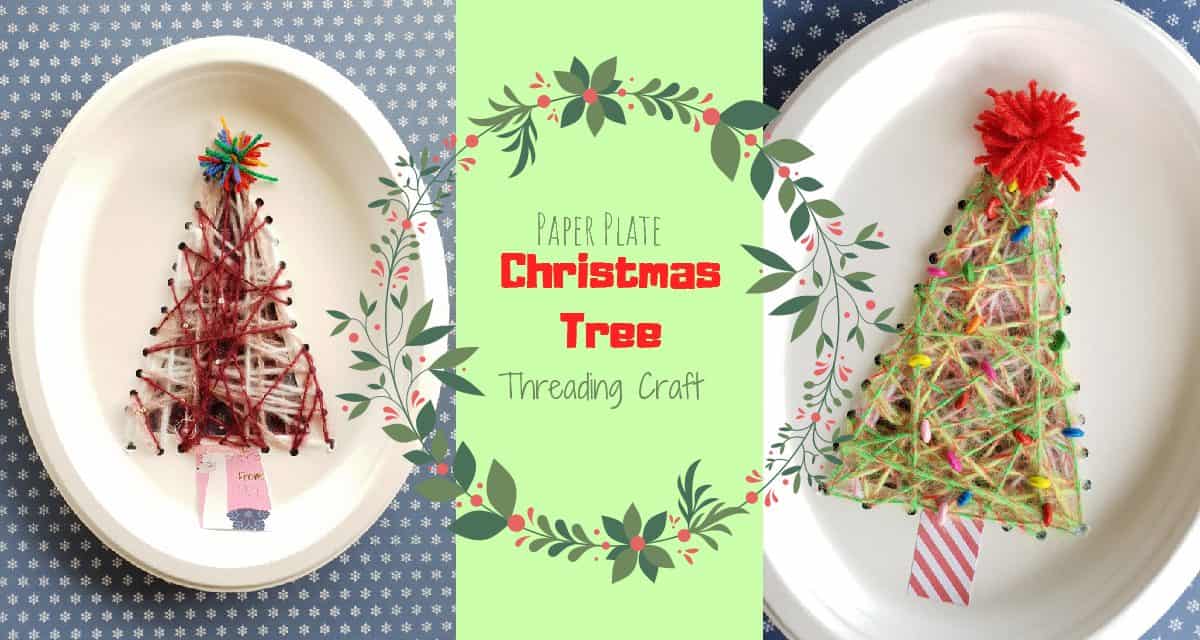
Christmas Tree Paper Plate Threading Craft
If you are thinking about Christmas and kids crafts then you will love this Christmas tree paper plate threading craft. This is a simple craft which is lots of fun and kept the kids (and me) occupied for ages! Chances are you already have what is needed to make this craft at home. Great for fine-motor development, what’s not to love?
Today Miss 6 had a day off school so I wanted to do something fun with her. She LOVES anything to do with craft and Christmas so I knew she would love this Christmas tree paper plate threading craft. Her younger sister Miss 4 joined in and with a little help found it enjoyable but it didn’t hold her attention quite like Miss 6. The background around the Christmas tree even got decorated by Miss 6, that’s how much she loved this craft!

Christmas Tree Paper Plate Threading Craft
You Will Need:
- Paper plate
- Yarn
- Beads (optional)
- Hole punch
- Scissors
- Pencil
- Cardstock paper
- Glue
Directions:
Preparing the paper plate
Gather all of your supplies and get the threading craft organized ahead of time. Start by drawing a triangle onto the paper plate and cutting it out. Around the edge of the triangle using a hole punch, punch evenly spaced holes. We only had a small traditional hole punch on hand which made it tricky/ impossible to punch a hole in the triangle corners. Use a hole punch with a single punch if you have it otherwise, do as I did and carefully use scissors to manually cut a hole where the hole punch can’t reach.

Choosing yarn
Pull off and cut a length of yarn. Keep in mind that fluffy yarn will be trickier to thread, a small knot tied at the end will help with this yarn and yarn which is prone to separating. Younger children will struggle with long lengths so cut it shorter for them. You also don’t want the yarn to be too thick as that will make it too difficult to thread. If you have it a plastic needle can be used, we didn’t have one and both of the girls were fine with threading the yarn through.
Threading
Now for the fun part! Tie the yarn to the paper plate, through two holes which are next to each other. Thread the yarn randomly through the holes. There is no wrong or right way to do this. Miss 6 went through a phase of putting it through every 4 holes and then not putting it through any hole but around the yarn itself! In the end, ours looked pretty similar. When needed, cut another length of yarn and continue the threading process. When your tree is almost complete beads can be threaded onto the yarn as adorable tree ornaments.

Pom Pom
We made a simple finger pom pom. There really isn’t an easier or faster way to make a pom pom! Wrap yarn around your pointer and middle finger (leave a small gap between these fingers). Tie between the fingers and slip off fingers, tighten the knot. With scissors, on each side, cut where the yarn is looped over. Tie this pom pom on the top of your tree. Alternatively, make a star from cardstock!

Base of tree
Cut a small square or rectangle from a piece of cardstock and glue at the base of the tree. Alternatively, this could be drawn on.
Your tree is now complete! If desired decorate the plate, like Miss 6 did with snowflakes and gifts or any other drawing you like.


–


latest video
news via inbox
Nulla turp dis cursus. Integer liberos euismod pretium faucibua
you might also like
Preschoolers can be tricky to find appropriate interesting crafts, which […]


