
DIY Scratch Art Stars
We have been busy making these super fun DIY Scratch Art Stars to celebrate the New Zealand Māori festival Matariki. Although they take a little time to set up scratch art stars are a simple activity that required minimal resources. You will most likely have everything you need already at home. Once they are made and ready to go creativity is unleashed and many stunning variations of these lovely stars can be made.
Matariki is the Māori name for the cluster of stars also known as the Pleiades. It rises during mid-winter and marks the beginning of the Māori new year. Traditionally, Matariki was a time to remember those who had died in the last year, however, it was also a happy event – crops had been harvested and seafood and birds had been collected. Nowadays Matariki brings people together to celebrate Maori culture in a fun and festive way.
DIY Scratch Art Stars
This post contains affiliate links. These links add no cost to you but we earn a commission through linked sales. This helps to keep diyThought running. Thank you for your support!

These scratch art stars are a great activity to do alongside a study on Matariki, space, or just for a fun arts and craft activity! They are simple to prepare and really are a lot of fun. This activity can even be done as a class activity. Get the children to colour the card and paint one day and then cut and create their amazing scratch art design the next.
You Will Need
Not much is required to make your own scratch art stars, just these items listed below. If you are using metallic cardstock then the crayons/ pastels are not required.
- Thick cardstock* or Metallic cardstock(needs to have a shiny surface if using metallic) approx 250gsm is a good weight. You can also use cereal boxes for a recycled alternative.
- Crayons or pastels
- Black acrylic or tempera paint and a paintbrush/ foam brush
- Liquid soap
- Star printable (use the one found over on our Foil Art Star tutorial) or draw your own
- Scissors
- Kebab stick, toothpick or similar
*The cardstock needs to be thick enough so it will not tear when scratching the paint off with the kebab stick. We used junior acrylic paint and a standard acrylic art paint for our scratch art, both worked well. Many people use tempera paint so this is a good option also.
Let’s Get Creating
Make Your Scratch Art Base
Colour or metallic
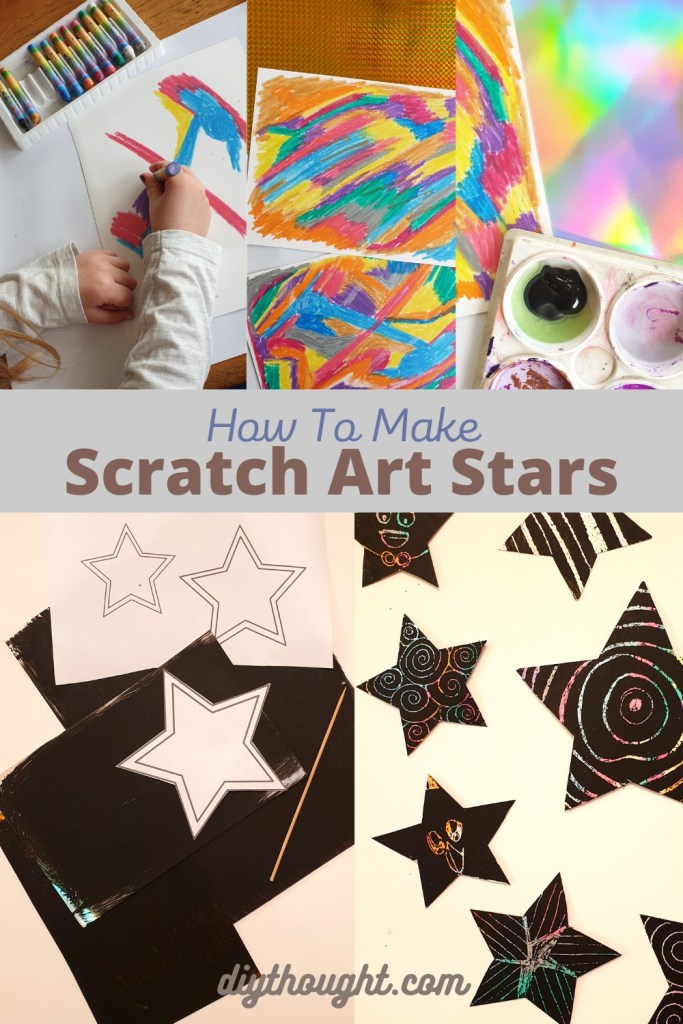
To make your base you can either colour a piece of cardstock (or recycled cereal box) entirely using crayons or pastels or you can use a shiny metallic cardstock.
When colouring our bases we used pearl crayons which glided on and took next to no time to colour but just use whatever you have on hand at home. Make sure that you put on a thick layer of pastel or crayon as this will be beneficial when it comes to scratching the paint off. Colouring the bases is a great way to extend this activity but if you are wanting to quickly whip up some scratch art ghosts then the metallic card will be the way to go.
Paint
Mix up your paint with some liquid soap. The soap will help to make the paint scratch off with fewer flakes. We used about 2/3 paint to 1/3 soap but don’t worry too much about measuring this out. Just use more paint than soap.
Now paint a layer onto your base. Try to make the paint even but don’t worry if you can see some of the base as the second layer will cover it up. Once dry apply the second layer and leave to dry.
Cut out the stars
Print and cut out the star printable which is found over on our Foil Art Star tutorial. Lay the cut-out stars onto the back of your dry scratch art base. Carefully trace around the star templates and then cut out. Repeat until you have all of your scratch art stars cut out.

Decorate
Now the fun really begins! Use a kebab stick or other sharp item and scratch any designs into the stars. Be as creative as you like, faces, lines, any fun pattern will work well.
You May Also Like
- The Seven (9) Sisters of Matariki Star Printable
- 6 Matariki Star Crafts
- DIY Ghost Scratch Art
- Foil Art Stars

Thank you for stopping by. We hope you enjoyed making these DIY Scratch Art Stars!


latest video
news via inbox
Nulla turp dis cursus. Integer liberos euismod pretium faucibua
you might also like
Preschoolers can be tricky to find appropriate interesting crafts, which […]


